klipsch
-
Posts
177 -
Joined
-
Last visited
-
Days Won
18
Content Type
Profiles
Forums
Blogs
Gallery
Downloads
Articles
Media Demo
Events
Everything posted by klipsch
-
A diy vac with 3 lighthouse motors will run around 700 bucks for melamine box (melamine makes sealing easy), pvc, mdf, pvc glue, circuit breaker, etc. I have two layers of mdf (one is the spoilboard). I made something similar to the below. It is based off of a Gary Campbell design: http://www.talkshopbot.com/forum/showthread.php?19556-Vac-box-setup-Complete The two skrams will be going behind a screen in our basement. Probably only to be heard and never to be seen again. There is no such thing as too many clamps Your cabs look great. Really nice job with the design and cnc work. Very clean. Looks like you and Kregg have been really busy too! I hope your design gets you that flat 30hz you're looking for in a transportable form. I'll find your avsforum post when you get to it. I am hoping to have these cabs done and running in the next 3 weeks. Doing some traveling...
-
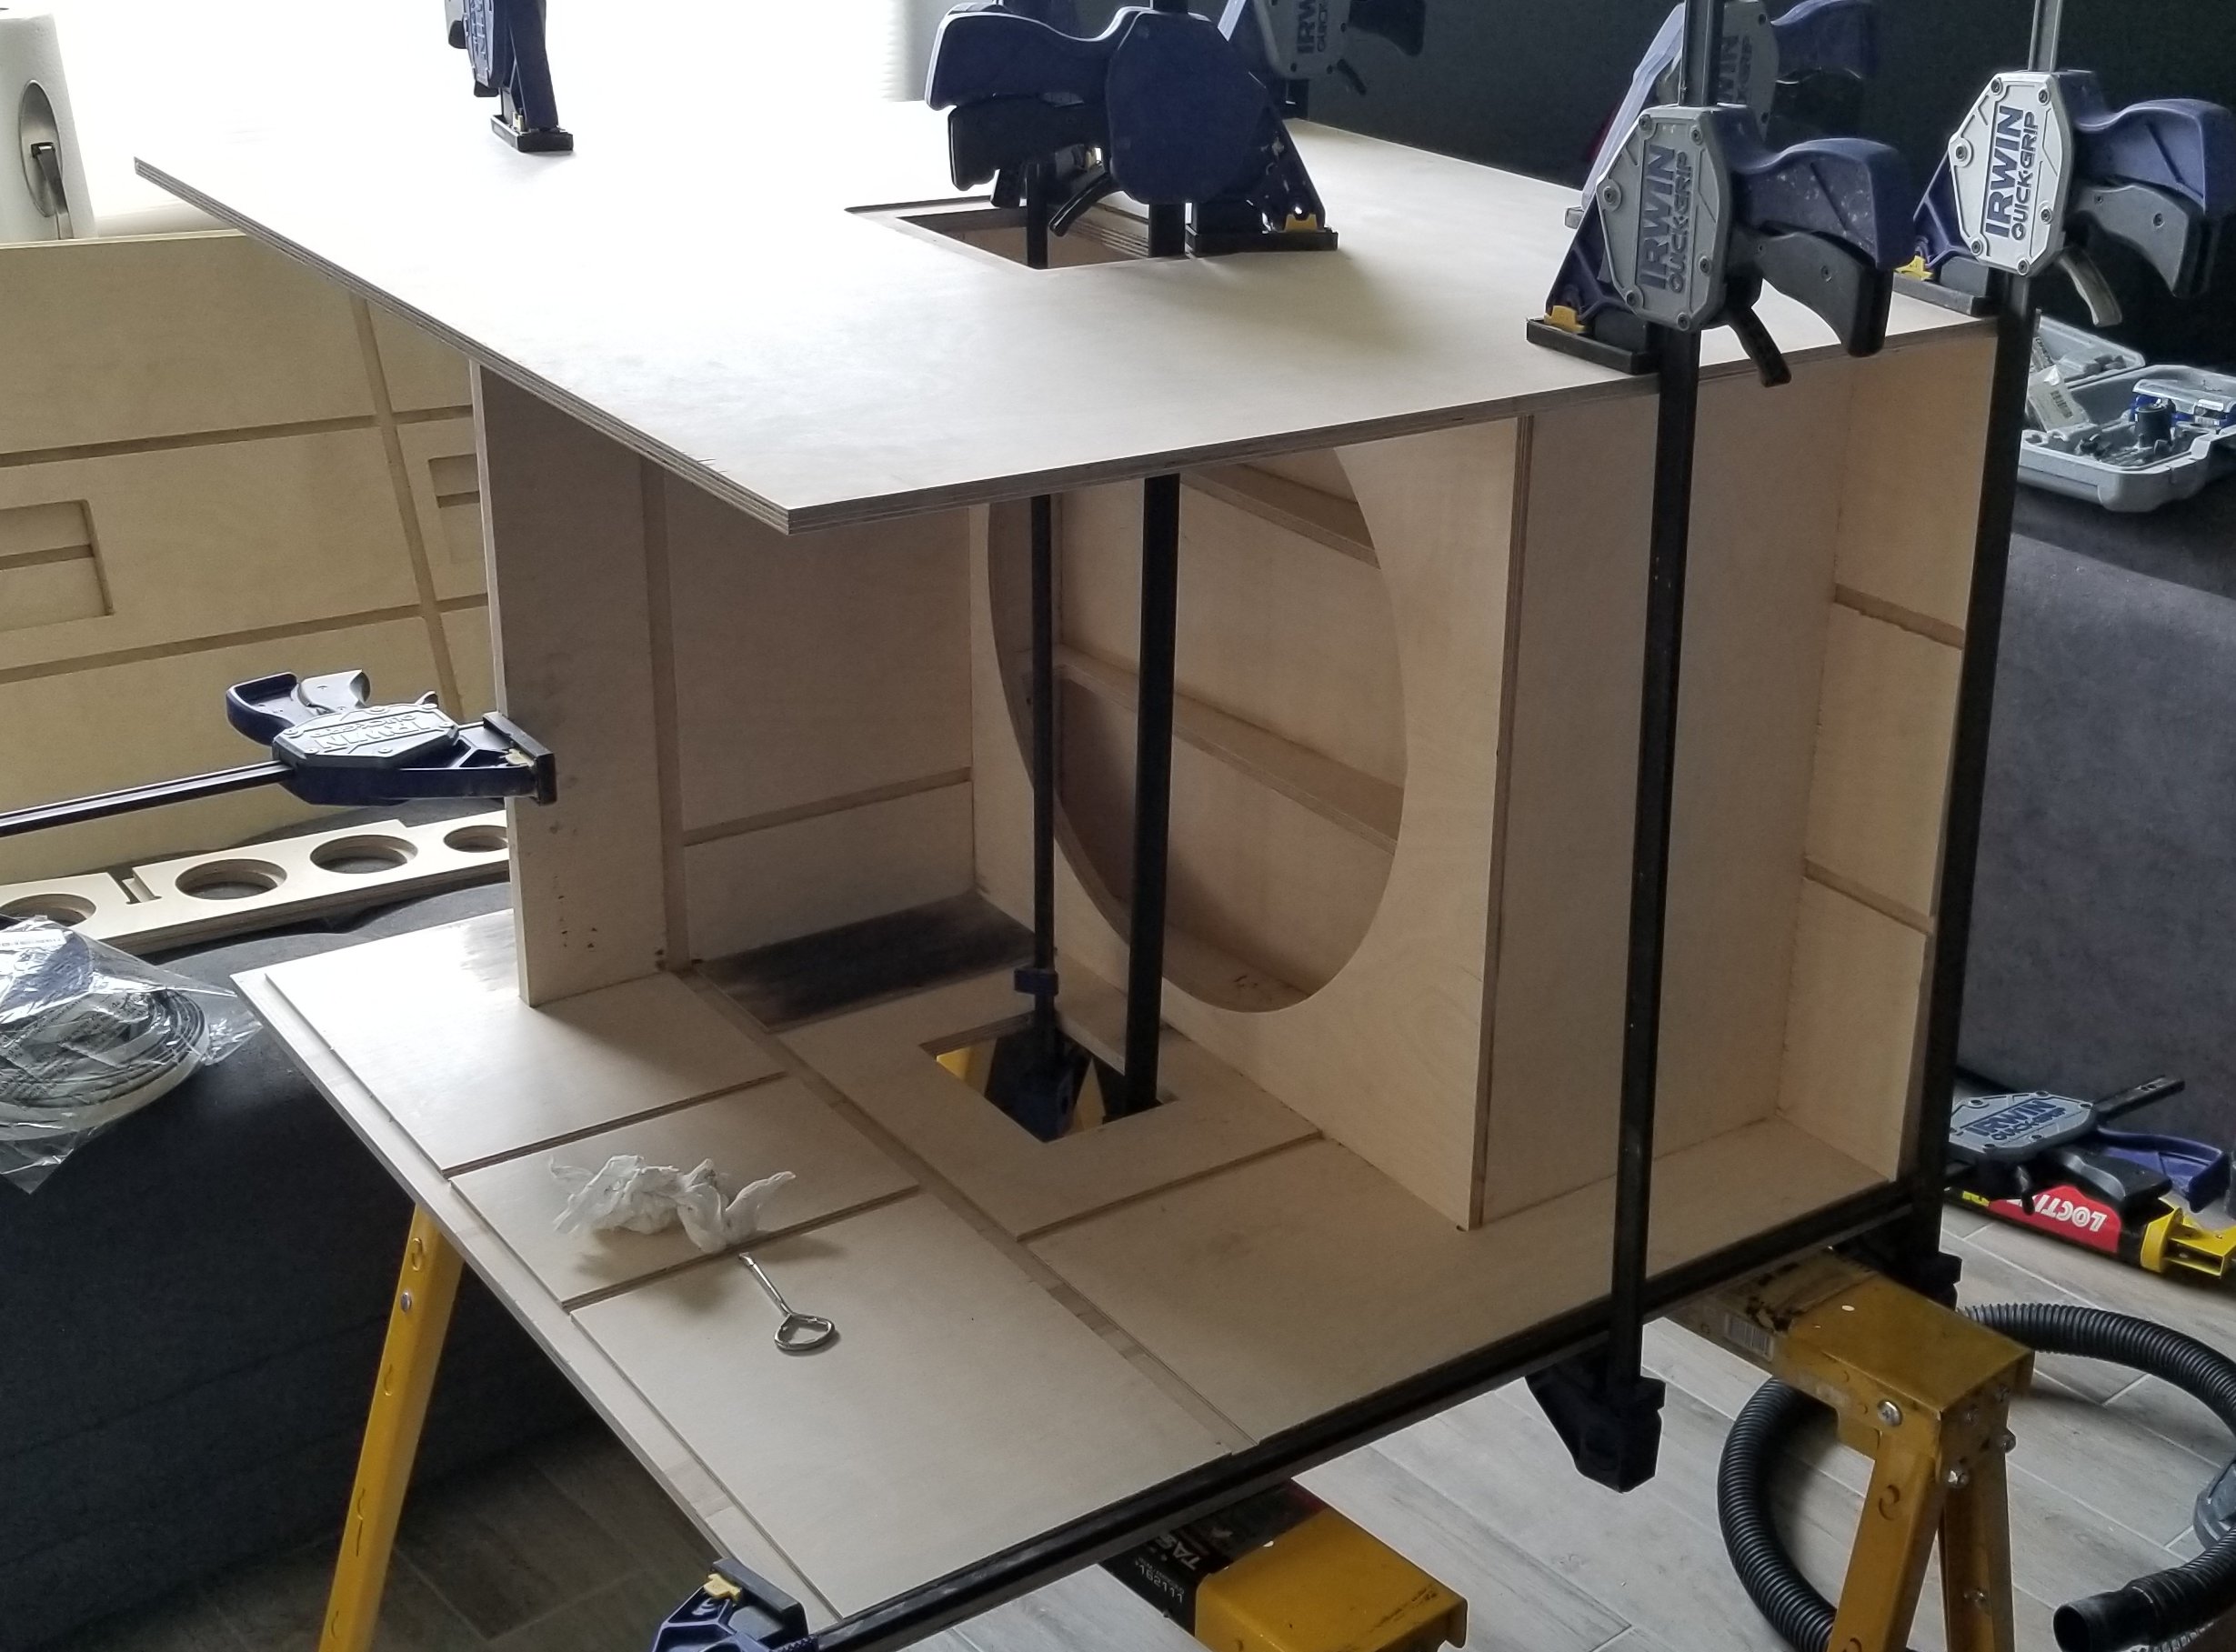
Vacuum hold down will change everything :). These cheap vac motors will take 1/2" warped sheets down flat. 3/4" warp sheets will go flat as well, but only if the warp is slight. If these cheap vac motors were replaced with a much more expensive regen vac motor, then there isn't much that wouldn't be flattened. Servos are very nice. Steppers work just fine too. This HSD air cooled spindle is not loud at all. I can hold normal conversations with just the spindle on. The cutting of the material is far louder than the spindle motor and the vacuum motors. However, all of that is no where near as loud as the dust collection system. Water cooled spindles are quiet, but do have more things to do for maintenance and operation. In my experience, for wood, typically I'll use climbing for first pass and conventional for final pass. For dados/grooves/joints, I'll do full axial path in climb and leave a bit on radial. Then do full axial and radial conventional path to remove the remaining radial stock material. For profiles, I'll do climb and leave 0.04" axial and typically 0.02" radial. Then do the final pass with conventional for remaining. This usually yields good results regardless of grain direction. Climb can be less forgiving against the grain. Higher RPM can combat that, but then an increase in IPM is usually needed, etc. The wife wanted me to stain these like the other sub cabinets we have. Current plan is to sand lightly and poly them. No duratex on these two. I really like your joints. They look nice for fit and great for final assembly. Long ago I used to glue and use brad nails, but have just been "gluing" with Pl premium 3x and clamping for years now. With CNC cutting (assuming joints or similar like yours), screwing and nailing has not been needed for me or others. Heck, I've seen people use Pl premium and painters tape instead of clamps with joints like yours. The tape was enough to hold everything in place while the adhesive expands and cures. I've had 4 DO 18" sealed subs running for 6+ years with no issues with the Pl premium and clamp method. I do use kregg's pocket jig and screws for things cut on a table or miter saw, even with that square headed bit Some clamping action: Have any pictures or models of the inside of that cab?


-
Making a vacuum table is not too difficult. It may not be something you would want to do, but underneath an mdf or ultra light mdf spoilboard is a vacuum board with a pattern cut by the cnc that looks similar to the below. The vacuums connect from underneath to the hole cutouts in the vaccum board via pvc pipe. Different zones can be made on the vacuum board and then can control the vacuum to the zones with blast gates in-line with the pvc. The vacuums lower the barometric pressure beneath the surface of the spoilboard which creates push down force on the material resting on top of the spoilboard. It has worked very well for many (me included). Without knowing the torque vector of your spindle or router, rigidity of your machine, etc., what works best for you and your machine is all that matters and chipload calculations and calculators can be a nuisance. If it will help and you want, I attached a decent chipload calculator that could be used as a reference point. With my main 4.2 hp spindle and machine, I would start with a new material around the chipload recommended in "aggressive". With a router (not a spindle) around 3 hp for Baltic birch plywood, I would have started around a 0.004 - 0.006 chipload. chipload calc.xls This may not be your goal, but in order to extend my bit life, I like to be able to touch the bit after a job and it feel cool to the touch. The speeds I want to cut at and the material finishes have worked well with that cool touch bit as well. Ran another skram sheet last night for the second skram. Here are some chips from the hatch (2 flute 1/4 inch compression bit, ~12,000 rpm @ 240 ipm climb leaving .04" material - nearly full depth profile cut - bit cool) : Added a quick 1st coat of wet stain on skram number 1 last night too:


-
I really like BB too. The Janka score can be around 1200 and I think as low as 1000. I think that's a decent range to account for when cutting. Over the years, there is a sound I've learned from others and my own work which helps figure out if the cutting rpm and feedrate are not good. Anything high pitch like a screech is typically not good. Visually speaking, if there is dust and not chips, then that is also usually bad (even for mdf).
-
I ran a while without a vacuum hold down. There are motors here in the US for about $160 that last about 1200 to 1500 hours. 2 or 3 of them with 2 sheets of melamine for a housing will get you over 5 hg if that is something you choose to pursue. Not sure what you have available in your part of the world. Prior to the vacuum hold down, I would make tabs of .25" wide and .0625" thick. They worked well, but took work when finishing like you've mentioned. I then went to onion skinning from tabs and had much better results. Using a down cut bit helped keep the material on the table without a vacuum, but meant any plunge cuts were not too clean (more of a burn than a cut). To work around the plunge cut issues, ramps were used where they could be. A compression bit gave me the ability to do plunge cuts cleanly and still have decent down pushing pressure on the material without a vacuum and using tabs. Is the straight bit causing some "chatter"? 20,000 RPM at 150ipm for a single flute bit should produce a chipload around .008. Is that about what you are making? I only ask as when I was first starting out, I was running too high of RPM which made more heat and dulled my bits (was also using cheap bits). When that happened, the onion skinning and tabs both suffered as the wood was being pushed more than cut.
-
Hey peniku. Yes, that is my cnc. I added, what may be, extra detail which made this a longer reply. Hopefully adding some detail helps to better answer your questions. For each of the sheets, no holding tabs were used. Instead, about 5 hg of vacuum hold down was used. For a few of the pieces requiring 2 sided work, the vacuum hold down was bumped up to 10 hg. Onion skinning can work better for rigidity and finish in my experience vs tabs when working with quality plywood sheets. What are your experiences? Your eyes are good. A 1/4 inch 2 flute compression bit was used throughout at about 250 ipm and ~12k rpm. Single climbing passes were used for all pocket/groove/slot/recess cuts. Two passes were used for the inside and outside profile cuts: one climbing pass at about 98% depth and 1 conventional pass at 100% depth. Those settings worked well throughout and I do not plan to change them for the 2nd skram. I thought about using a 3/8 inch bit for most of the cutting to be able to run > 450 ipm, but that used a little bit more material and would need a slightly different layout. Since I'm not mass producing these for profit, I stuck with the cheaper 1/4 inch bit. Looking back at my rough notes and machine logs, the following should be approximate cutting times for 1 skram: 12 mm baltic birch sheet: ~18 minutes 18 mm baltic birch sheet1 with the left and right side...: ~40 minutes 18 mm baltic birch sheet2 with hatch, bottom, top..: ~20 minutes 18 mm baltic birch sheet3 with single driver cutout: ~2 minutes Each second side cutting for the parts that have handle recesses took less than 5 minutes total for set up and cutting for each. There are 4 parts with 6 handle recesses, so I think a conservative estimate of 20 minutes total is accurate-ish (5 minutes x 4 parts). The second side cutting for the back part which fits the hatch part took less than 10 minutes for set up and cutting. Total time with setting up the sheets, parts, tooling, machine, and cutting for one skram is probably around 2 hours and 10 minutes with the 1/4 inch bit. How long did it take you to cut one?
-
Thank you on all accounts! Same to you!
-
Finally had some personal time to make some chips. Dry fitting the first one before moving on to cut the second one. Thanks for the design Ricci! Are you all using any acoustic foam inside the skrams? pictures or it didn't happen:


-
Thank you!
-
Any chance you could throw the 18sound driver in there?
-
Looks very nice!
-
Thanks! The Eminence really models closely to the IPAL and should be much easier to drive. Price VS modeled performance is an interesting decision
-
Thanks! I feel that would be appreciated by many
-
So many driver choices. Great news! Sure would be nice to have a comparison of each in one set of graphs
-
The Eminence NSW6021-6?
-
Naturally . There were 9 in stock. I bought 2. I use camelcamelcamel.com for price alerts. Perhaps there are similar sites for those not in the States.


-
Price drop on the 152s 4 ohms at amazon. $500 each https://www.amazon.com/21SW152-4-21-Inch-Ohm-Neodymium-Subwoofer/dp/B00HJK24GC
-
I would have said the same thing! What I've observed is that it depends on species, glues used, and where it was made. I've seen Chinese 9 ply birch that was no where near as good as US 5 ply pine (Chinese was flimsy, warped, etc.) The Chinese ply had 1/120th veneer and the US had 1/40th (as measured with calipers). The birch Chinese plywood also looked like it was made with Douglas fir as the cores that had birch veneer on each face. I'm just going by my own experience of people bringing me material to cut here in the north east of the States. These may not be issues in your experiences and locale. Been traveling a bit lately. Hoping to get home and make some skram saw dust.
-
Birch here in the States is cheap in my area, but it is usually Chinese crap. The Canadian birch here can be decent. 13 ply Baltic birch in my area is 3x the price per sheet of good southern US pine but the Baltic is 5x5 VS 4x8 for the pine. Would really love to see an objective comparison. More plies isn't always a better thing either, but I feel like this debate has been had in every wood forum countless times. I avoid MDF cutting on the cnc. Not a fan at all.
-
I find that the made in USA southern US pine plywood is really nice stuff and is in most big box stores if you don't have access to a nice local lumber yard (usually about 30 bucks for a 7 ply and 36 bucks for a 9 ply 4x8) . It's a lot nicer from a rigidity and void/blemish perspective than the big box store birch plywood (especially when the birch is from China and not Canada). While classifications differ, I think the big box stores pine are BB/CP. Baltic birch plywood at A or B is another story. I wish I had the equipment and time to test resonance differences and such between the same cabs built in various materials. (looks not being a concern, just objective sound performance)
-
Yes. 4x8 sheets. I generally use 4x8 pine if painting with duratex/restorex equivalent and using fasterners. The expense of a maple or Baltic has not seemed worth it in my experience unless staining.
-
skramsheet3.dxfskramsheet2.dxfskramsheet1.dxf Looks like it could be made on 3 sheets if all were 23/32 or 18mm thick sheets. The slots would need to be adjusted though from the ~.495 to the ~.724 on a few of the parts now. Thanks for the dxfs @dsl1 If you make an actual cutsheet dxf, please share
-
Thank you for clarifying! I apologize for not realizing that to begin with. I have a B&C 21SW152 8 ohm version sitting in a box. I guess I should work on nesting some of your dxfs and make the 152 a home.
-
Thanks dsl1. Still no dice. If I import the dxf's into VCarve, Aspire, or Fusion360 in metric or imperial, I still do not get the same sizes as shown in the pdf. Maybe I should not be comparing the dxfs to the pdf? Edit: After looking at more parts, it appears that the dxfs provided do not match up with the 233186287_Skramprint.pdf (and maybe they were never intended to be). Example: 1472850171_TopBraceSkram_TI.DXF would theoretically be Sheet 16 Part M in the 233186287_Skramprint.pdf. However, it looks like 1472850171_TopBraceSkram_TI.DXF is really Part M and Part N together in the 233186287_Skramprint.pdf. If that is true, I've been comparing things I should not have been, no?
-
double post