


Boomer1950
-
Posts
59 -
Joined
-
Last visited
-
Days Won
5
Content Type
Profiles
Forums
Blogs
Gallery
Downloads
Articles
Media Demo
Events
Everything posted by Boomer1950
-

69 yr-old guy needs advice with 1st DIY sub
Boomer1950 replied to Boomer1950's topic in Bass Projects
The box building has begun...

-
69 yr-old guy needs advice with 1st DIY sub
Boomer1950 replied to Boomer1950's topic in Bass Projects
I found your website the other day & was impressed with your subs. They look wonderful & I'm sure they sound even better. Very serious subwoofers. -
69 yr-old guy needs advice with 1st DIY sub
Boomer1950 replied to Boomer1950's topic in Bass Projects
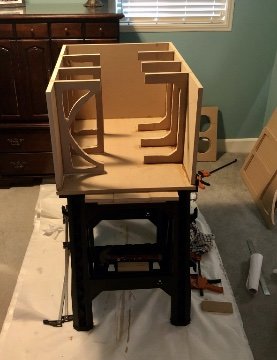
Thanks for the suggestion. Putting a couple of braces across the middle won't be difficult. It's comforting to know someone is looking over my shoulder. It's going to take shape pretty quickly now. After a year & a half of imagining what it will look like, it'll be strange to see the actual box sitting in my house. Initial impression? Pretty damn big. I know people make much larger subwoofers, especially on this forum, but my current 12" ported sub is about a 2.4 cu.ft. box. This one is a 9.25 cu.ft. box. Bigger. -
69 yr-old guy needs advice with 1st DIY sub
Boomer1950 replied to Boomer1950's topic in Bass Projects
Thanks for the kind words @dgage I hadn't planned to have any pieces between the side braces. Certainly open to suggestion though. I could make pieces 2" wide to run between the sides. How many braces like that would you recommend? -
69 yr-old guy needs advice with 1st DIY sub
Boomer1950 replied to Boomer1950's topic in Bass Projects
Hole Cutting - Finished. 1st picture is inner baffle. The 2nd pic is both the Inner & Outer baffles. Time to glue all these pieces together...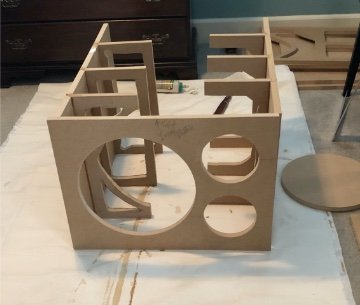

-
69 yr-old guy needs advice with 1st DIY sub
Boomer1950 replied to Boomer1950's topic in Bass Projects
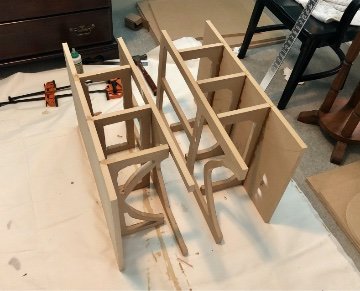
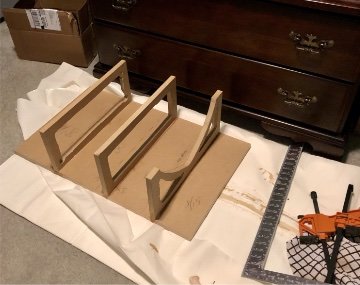
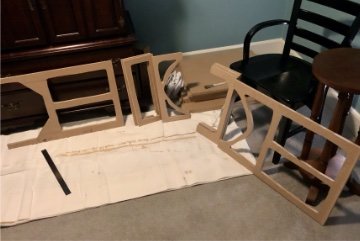
After I glued all of the braces to the sidewalls I stood them up to create the 25" width of the finished subwoofer. Then I propped up the long braces in approximately the proper location. They run from the front wall to back wall & will be glued to the side braces. Then I propped up the back onto the other pieces just to get a better sense of the size & future fit of these elements. The first picture with back piece in place shows how the side braces on the left & right are not spaced the same distances apart - to break up the symmetry. I cut a couple of 6.25" holes for practice. That's the size of hole needed for the 4" port flares I bought from Parts Express (which they got from Precision Ports). I think I'm ready to start cutting the holes in the front baffles. I'll be cutting the inner baffle first in order to have a little more practice before I cut the outer baffle. But, it's much easier to cut the holes with a Jasper jig than I anticipated. The peg inserted into the 1/8" hole drilled in the center of the circle & then inserted into the jig keeps the router on track really well. Now it's time to cut holes in the actual baffles...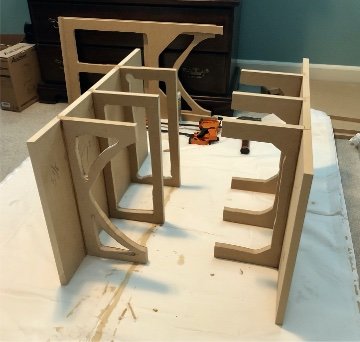


-
69 yr-old guy needs advice with 1st DIY sub
Boomer1950 replied to Boomer1950's topic in Bass Projects
Given my low skill level my decision to cut dadoes in the side walls might seem inadvisable. But after watching a couple of videos, I thought I could do it. The sidewall braces don't run from one wall to the other, so recessing the brace by 3/16" would not cause any problems. I did a couple of practice cuts & discovered that my 3/4" router cut a dado slightly less wide than the 3/4" MDF. I used the advice I found online & placed a strip of blue tape on the guide board & cut again. Still doesn't fit. Another strip of blue tape - another cut - and the MDF fits snuggly. I started gluing the side braces into the dadoes - trying to keep each one square.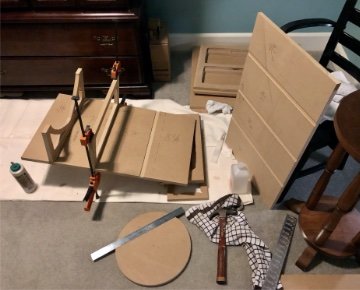


-
69 yr-old guy needs advice with 1st DIY sub
Boomer1950 replied to Boomer1950's topic in Bass Projects
Thanks, Ricci. Things seem to be going well. I think your advice to take my time is crucial during a first-time build. But today I remembered what it's like to experience sublime pleasure from a very small event. The evidence of my small accomplishment (that thrilled me no end because I've been so intimidated about cutting the baffles) is below. Even though this was just practice I'm still happy I was able to cut my first hole successfully. I used a Jasper circle jig. I had to drill a new hole in the jig to make it work with my router. Still worked like a charm. Obviously, this is the disk & not the hole, but the hole looks nice, too.
-
69 yr-old guy needs advice with 1st DIY sub
Boomer1950 replied to Boomer1950's topic in Bass Projects
I want to back up for a moment. A lot of the build threads here & on other forums are done by people with woodworking skills or, at the very least, woodworking tools. Other than a handsaw, hammer & a cordless drill I had nothing I needed to make the box - especially skills. I bought a couple of Worx saw horses (that came with a couple of clamps) & a small router to start. I made a work surface for the saw horses out of scrap material from the 3/4" MDF that was cut for me. I went the more complicated way by designing the box myself using subbox.pro primarily. I also learned how to use WinISD (well enough, I hope). But, I had no background in engineering or 3D modeling software. I did have some experience with Photoshop (I now use Pixelmator Pro on my MacBook), so I designed the pieces I needed using it. That explains my rather colorful sketches. I wanted to make sure everyone understood that there was little reason for me to think I could do this. Of course, that discounts all the help you get from this forum which has been invaluable. I know this forum skews towards people with extensive sub building experience. The expertise here is stunning. But (hopefully), I'll show that someone with no experience, no tools, no skills can still build a sub. This entry will look terribly dumb, if I don't finish my sub or if it sounds like a piece of shit. I'm assuming that neither of those things will happen.
-
69 yr-old guy needs advice with 1st DIY sub
Boomer1950 replied to Boomer1950's topic in Bass Projects
Here's a picture of the progress I've made on the braces. They look pretty good, if you stand about 10-15 feet away & squint slightly. I'm sure they will still be able to perform their function - bracing.
-
69 yr-old guy needs advice with 1st DIY sub
Boomer1950 replied to Boomer1950's topic in Bass Projects
I think the relationship between speed of the router blades & the speed of movement of the router are more related than I knew. Just being aware of this will make things go more smoothly for me. I have one brace to finish & then I start on the circle cuts. I have definitely improved my technique to the point that my confidence about completing this job successfully is pretty high now. Of course, I won't allow myself to become over-confident & lose my concentration. I am using 3/4" MDF. I don't plan to use anything but glue & clamps to construct the box. I've glued & clamped some scrap material just to get a feel for the amount of glue & the proper clamp pressure. I think I have a good grasp of the technique. A little more work before I start gluing. It's moving along & I'm getting excited about the rest of the construction. -
69 yr-old guy needs advice with 1st DIY sub
Boomer1950 replied to Boomer1950's topic in Bass Projects
I had not associated the speed of the router with the speed I move the router. It certainly makes sense. I'll keep that in mind. I realize that when the router starts to vibrate or sounds odd, I need to stop immediately. That's finally getting through my thick skull. I kept trying to "power through" those moments. I hope I know better now. The brace today went the best yet. One more to go. You'll notice I don't get much done each day. Prerogative of a retired person. -
69 yr-old guy needs advice with 1st DIY sub
Boomer1950 replied to Boomer1950's topic in Bass Projects
@dgage don't worry. You didn't scare me, but you've confirmed what I've discovered so far. Concentration & small increases in depth seem to be key factors in routing success - especially for a beginner. The brace I cut this morning (after reading all the good advice here) is the best I've done so far. I still have 2 braces 18.5" x 30.5" to finish. After those I should be ready to take on the circles on the baffles. The practice has been essential. As has been the advice. -
69 yr-old guy needs advice with 1st DIY sub
Boomer1950 replied to Boomer1950's topic in Bass Projects
Thanks for the advice about routing. It's a major concern for me, since I have no previous experience using a router. My plan is to use the router to cut away material from the braces I'm using inside the box. After creating 6 side-wall braces & 2 longer braces I'm hoping the process will be smoother as I learn a little. I'm comforted by the fact that no one will ever see my "router practice" braces after I finish the box. They are certainly structurally sound, but not exactly beautiful. An added benefit - every one of my braces will be somewhat different from the others reducing the chance of the same resonant frequencies being created (I don't know if that theory has any basis in fact, but it helps justify my irregular routing techniques). I know I'll be buying a circle jig, but I haven't decided on which one. There are a few that look like solid choices, but I am struggling with the selection of the jig. I'm using a 1/4" straight bit now to cut the braces. I think my best option is to be patient. If I try to cut more quickly or more deeply, I run into problems. With the circles I plan to move slowly & carefully with each pass - increasing the depth of the bit slightly each time. Your advice about the direction of the router matches with other sources I've read. Cutting circles should be in a clockwise direction. I can handle that. Also, making sure the piece being cut away is "clamped" in some way (nailed or screwed to the base board) was new to me. Obviously, it's necessary to keep that center circle from moving at the end of the process. Excellent point. Whoa, I wish I had a dust collection method. The amount of dust is stunning. I'm working in my storage building, thank god. There will be NO routing inside my house. Tons of dust. Thanks for the advice. I need all I can get.

-
69 yr-old guy needs advice with 1st DIY sub
Boomer1950 replied to Boomer1950's topic in Bass Projects
I found someone to cut MDF into square pieces to my specifications. I didn't find anyone to cut the circles or make the braces (I didn't try very hard). So... I'm buying a router & I'll learn to do it myself. Novel concept. This will slow me down, but I'm not in a big hurry. It'll be a few days before I get the cut MDF. I found a Crown CDi 1000 at a good price. It produces 1400W bridged at 4ohms. I'm very pleased. It's on the way here. Things are actually happening. Money has been spent. Sometime in the near future I'll have a new sub. -
69 yr-old guy needs advice with 1st DIY sub
Boomer1950 replied to Boomer1950's topic in Bass Projects
I am planning to install the C braces on the left & right walls at different locations relative to each other. -
69 yr-old guy needs advice with 1st DIY sub
Boomer1950 replied to Boomer1950's topic in Bass Projects
Thanks for the quick responses! I don't know why I forgot to post the braces I planned to use, but it's just as well, since I've made some changes after reading your comments. I plan to use 2 braces 18.5" x 30.5" running from the front wall to the back wall (bright green). Let's call them Long braces. I plan to put the Long braces 8.75" from the left & right walls. Each arm of the brace is 2" wide. Then there are "C" braces that are 8" x 18.5". I plan to use 3 C braces on each side wall. The vertical piece of the C brace is 1.5" wide to allow clearance for the ports - the upper & lower arms are 2". Putting foam between the braces & the ports seems necessary to prevent the ports from vibrating into the C braces, plus helping to support the ports. The last graphic is a view from the front showing the C braces (magenta) meeting with the Long braces (bright green).


-
69 yr-old guy needs advice with 1st DIY sub
Boomer1950 replied to Boomer1950's topic in Bass Projects
A couple of weeks ago I ordered my SI SQL-15 driver with dual 2 ohm voice coils. Now I'm looking for a cabinet maker to give my cut list to. I thought before I pay someone to start cutting MDF, I'd post my final (hopefully) subwoofer design. It hasn't changed much since my last post. 25" wide x 20" high x 32" deep - approx. net 7 cu.ft. There will be 2 - 4" ports 28" long (including the Precision Ports flared port ends - outside & inside). I'm planing to buy a Crown XLS1002 amplifier which is rated @1100W at 4 ohms bridged. Under TV Subwoofer 25" wide x 20" high x 32" deep - using 3/4“ MDF. Two 4" ports - 28” long (24” PVC pipe + flared ends) I'm aiming for a box tuning of approx. 18Hz. Top/Bottom - two - 25” x 32” Left/Right - two - 30.5” x 18.5” Rear - one - 25” x 18.5” Inner Baffle - one - 25" x 18.5” - 13.8” hole - centered vertically - 3.5” left of center horizontally Two - 6.25” port holes - Centered 5.25” from top/bottom & 5” from right side Outer Baffle - one - 25” x 20” - 15.4” hole - centered vertically - 3.5” left of center horizontally Two 6.25” port holes - Centered 6” from top/bottom & 5” from right side I uploaded a scale mock-up of the front of my sub that I made in Pixelmator Pro. The large gray circle is the 15.4" hole for the driver. The light gray circle around the port hole is the flange of the flared port. The dark blue circle is the 6.25" hole cut into the baffle. The light blue circle is the size of the port. If I use a straight port, will I have enough room between the end of the port & the internal wall? All feedback is appreciated.
-
69 yr-old guy needs advice with 1st DIY sub
Boomer1950 replied to Boomer1950's topic in Bass Projects
Ricci - the plan is to have the port & driver on the 20 x 26 side, as you thought. -
69 yr-old guy needs advice with 1st DIY sub
Boomer1950 replied to Boomer1950's topic in Bass Projects
About the suggestion of having two subs - I can't do it right now. I understand the advantages, but it is unaffordable at the present time. This sub will be such an improvement over what I've been listening to for the last 13 years that two subs are not very appealing to me. -
69 yr-old guy needs advice with 1st DIY sub
Boomer1950 replied to Boomer1950's topic in Bass Projects
Thanks for your comments, @SME. Because the problem you mentioned with arranging 3 Precision Ports on the front of my box is virtually unsolvable, I'm going to go with a slot vent. This construction is a little more complicated than using pre-made ports, but I don't think it will be beyond my capabilities. I've settled on a 7ft^3 box with a 70 sq.in. port that is about 40" long which I hope gives me a tuning of around 24Hz. I will be dividing the port into 3 pieces for added support & to give me the possibility of closing one or two of the ports. I assume dividing the 70 sq.in. port into 3 ports will lower the tuning, but that seems fine to me. I plan to start working on the box in the next few weeks. I'll keep you posted as to my progress. If there are additional comments or suggestions, I'd love to see them. Thanks again to everyone's help. -
69 yr-old guy needs advice with 1st DIY sub
Boomer1950 replied to Boomer1950's topic in Bass Projects
After further consideration I've made another adjustment to my plan. If I leave the box @7ft^3 & change the tuning to 20Hz, the port length drops to 22.25" - removing the need to curve the ports. Plus, blocking one port should take it into the teens for HT, if I've understood properly. If I get this type of performance from my first DIY sub, I'll be thrilled. -
69 yr-old guy needs advice with 1st DIY sub
Boomer1950 replied to Boomer1950's topic in Bass Projects
Thanks, Ukko. I noticed the sweep elbow you mentioned when I was looking for components for the ports. It looked preferable to the 90º angle piece. I will be able to source the pipes & fittings locally. I haven't tried Wine to run WinISD. I'll give it a try. -
69 yr-old guy needs advice with 1st DIY sub
Boomer1950 replied to Boomer1950's topic in Bass Projects
After working with some box modeling software I've come up with a new design. To the basics: I'm planing to use a 15" SI SQL-15 driver (with dual 2 ohm voice coils) & a Crown XLS1002 amp, 1100w bridged @4 ohms. My plan now is to build a 7 cu.ft. box (26'" x 20" x 29.35") with two front-firing 4" ports tuned to 16Hz. The ports will be 36" long - necessitating a curve in the PVC ports. I have a friend in the cabinet business & he will cut all of the MDF for me. I plan to assemble the box & ports myself. I've decided to put this sub between my L&R speakers & under the center channel. This will allow me to hide most of the box from view, but this location has restricted me to 20" high & 26" wide. The depth is variable. Because I only have access to a MacBook I've been unable to do any modeling using the driver I've selected. I don't know if tuning the box to 16Hz is reasonable for this driver, amp or box size. I'm not ready to start cutting MDF, so I'd like to know where I may have gone astray and/or made unreasonable assumptions. https://subbox.pro/en/b/wikqDKNb2 - the mock up of my current design. This program doesn't give the option to move the ports to the front or to indicate a curve in the port. Based on my research the length of the ports should be 36" - not the 33.83" indicated in the box design program. All feedback is appreciated - even if it (once again) exposes my ignorance. I have so much yet to learn. -
69 yr-old guy needs advice with 1st DIY sub
Boomer1950 replied to Boomer1950's topic in Bass Projects
Hi guys - I did a bunch reading since my last post. Shoulda done it before I posted that last message. I'm more educated about the relationship of the size of the box, diameter of port, number of ports, and the tuning of the sub. I knew so little when I started researching DIY subs that I'm constantly amazed at what I still don't know. I guess it's a good thing that I don't mind laying out my ignorance in front of all you more knowledgable people. I'm back at the "drawing board" to decide how low I'd like to tune my sub, how large of a box will be acceptable in my room, how many ports am I planning & the diameter of the ports. So, until I can get my head around the various parameters left for me to determine, I'll be working on these variables. It's like I've been thinking from the beginning - answering a few questions (how big of a driver, which driver, how much power, ported or sealed) just opens the door to additional questions. I'm glad I enjoy solving puzzles.


